
Track Your First Event
Send your first analytics event with a single Blueprint node.
Track Your First Event
Sending your first analytics event only takes a single Blueprint node.
TrackEdge automatically handles project initialization, player identification, authentication, and event tracking behind the scenes, so you can focus on building your game.
Step 1 - Add the Track Event Node
Open the Blueprint where you want to record an event.
For this example, we'll use BeginPlay, but you can call the node from anywhere in your game.
Add a Track Event node.
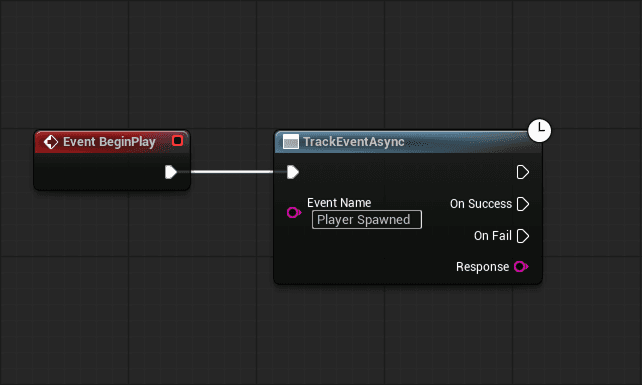
Step 2 - Configure the Event
Set the Event Name.
Example:
| Property | Value |
|---|---|
| Event Name | Player Spawned |
Step 3 - Play the Game
Press Play inside Unreal Engine.
TrackEdge will automatically:
- Initialize the SDK
- Identify the current player
- Collect device information
- Collect platform information
- Collect performance information
- Send your event to the TrackEdge backend
No additional setup is required.
If you're running the game for the first time, initialization happens automatically before the event is sent.
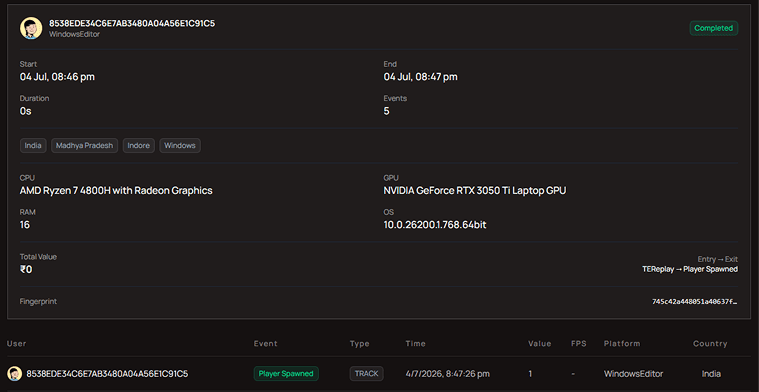
Step 4 - View the Dashboard
Open your TrackEdge Dashboard and navigate to:
Analytics
└── Events
You should see your event appear within a few seconds.
Screenshot
What TrackEdge Collects Automatically
Every Track Event automatically includes useful information about the current player and device.
Examples include:
- Player ID
- Platform
- Operating System
- Screen Resolution
- CPU
- GPU
- Memory
- FPS
- Engine Version
- Language
- Region (if available)
- Country (if available)
You only need to provide the gameplay event itself.
What's Next?
Now that you're sending events successfully, learn how to design meaningful analytics for your game.
➡️ Heat Maps