
Project Settings
Configure TrackEdge for your Unreal Engine project.
Project Settings
TrackEdge is configured from the Unreal Engine Project Settings.
Navigate to:
Edit
└── Project Settings
    └── Plugins
        └── TrackEdge
Screenshot
Add Screenshot: Complete TrackEdge Project Settings panel.
Project ID
The unique identifier for your TrackEdge project. Every analytics event, player session, replay, and map upload is associated with this project.
You can find your Project ID in the TrackEdge Dashboard.
API Key
Used by editor features that communicate securely with TrackEdge. Currently this includes:
- Map Capture
- Map Upload
Keep your API Key private. It should never be shared or included in public builds.
Base URL
The TrackEdge server used by your project. For most users, this value should not be changed unless instructed by the TrackEdge team.
Example:
https://trackedge.devAutomatic Replay
Automatically records gameplay whenever a supported level is loaded.
When enabled, TrackEdge will:
- Start a replay automatically
- Record gameplay
- Upload replay data in chunks
- End the replay when leaving the level
- Start a new replay when another supported level is loaded
Disable this if you want full control using the Blueprint or C++ replay nodes.
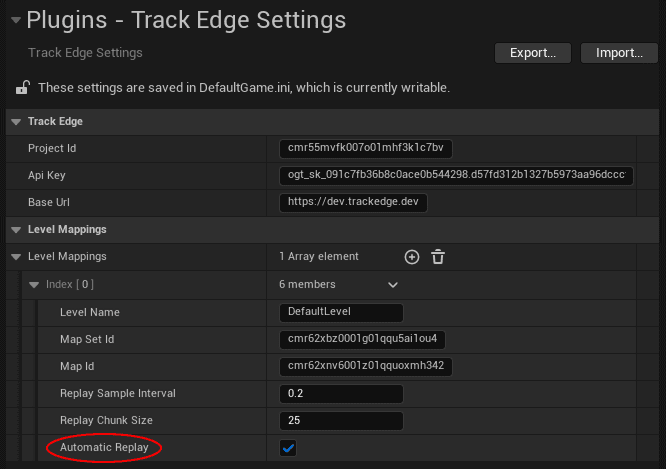
Replay Sample Interval
Controls how often TrackEdge records replay points.
Lower values produce smoother replays but generate more replay data.
Recommended:
0.25 SecondsReplay Chunk Size
The number of replay points uploaded in a single request. Smaller values upload more frequently.
Larger values reduce the number of requests but increase upload size.
Recommended:
10 PointsLevel Mapping
Each replay-enabled level must be mapped to a TrackEdge Map. Level Mapping connects your Unreal Engine level with the captured map displayed inside the replay viewer.
Next
➡️ Track Your First Event